vividreal | May 18, 2020
How to List Products on Flipkart for your E-Commerce Business?

Flipkart has emerged as one of the leading online establishments when it comes to the e-commerce industry.
As a seller, you want to make your products available for online purchase. We all wish it to be as easy as creating an account and starting the sales of your products online. But, it is not.
It involves essential steps which have to be followed in order for you to create a catalog for your products. Listing refers to the input of the required information and product-related images so that the customer is able to make an informed decision.
If you need professional help with listing your products on an e-commerce store, our team of digital marketing experts can help you out!
Let’s take a look at the steps you need to take to list products on Flipkart.
Where do you start?
First things first. You will not be able to list your products anywhere without creating an account. Register and sign up as a seller. You need to have the following handy.
- Goods and Services Tax Identification Number (GSTIN). If you are a marketer who wants to sell only books, this detail is exempted.
- Bank account details.
- Products you want to list and sell.
Fill in the required details and log into your account.
What are the steps involved in listing products?
There is a certain procedure which has to be followed in order to create a list of products and develop a catalog that you want to sell on Flipkart. There are two types of listing:
- Single Listing.
- Bulk Listing.
Let’s take the case of Single Listing first.
Number 1: Select your vertical category
Since products are categorized on Flipkart, it’s essential to select the correct category. Once you have logged into your account, follow these sub-steps:
- Select the “Listings” tab on the main homepage.
- Navigate to My listings> Add New Listings> Add a Single Listing.
- Click on the “Select Vertical” option on the left-hand side of the screen.
- Enter the category you want to sell a particular product under, in the search box.
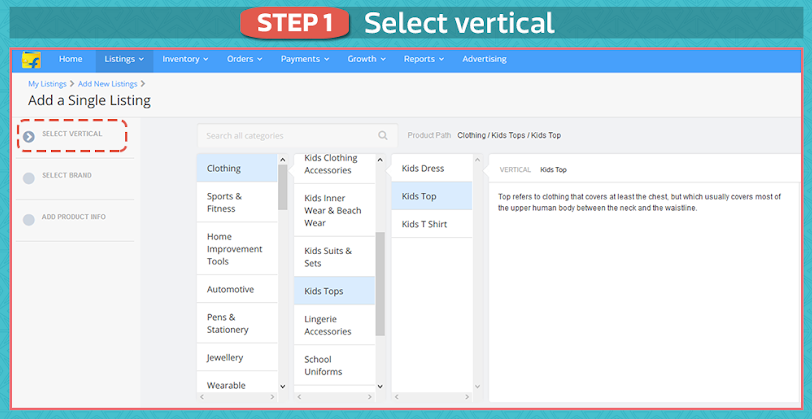
Image Source: flipkart.com
- Also, you can select the category manually from the list given on the screen.
- In case you choose a category under which you are not allowed to sell your products, an error message will be displayed on your screen.
- Navigate back to “My Listings” and choose the appropriate category.
- If the category is not available, apply for category approval by filling out a questionnaire.
Number 2: Select your brand
Once you have finished selecting a category, the next step is to select a brand.
- Navigate to the tab “Select brand” on the left-hand side of the screen, below “Select Vertical”.
- Enter the brand details.
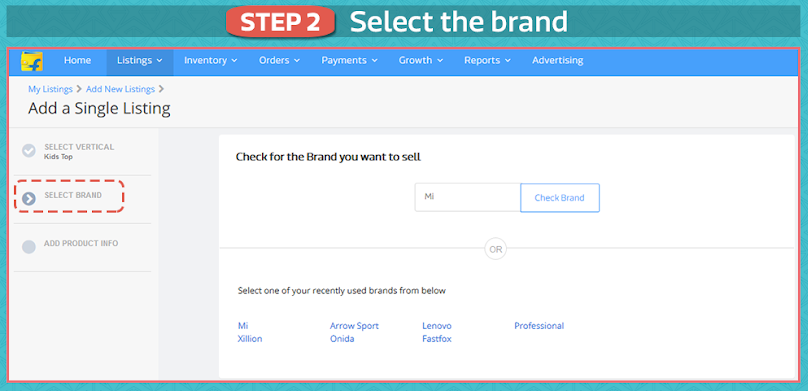
Image Source: flipkart.com
- When you go to the next page, put in the name of the brand and select the tab “Check Brand”.
- Click on “Continue” to proceed further, if the request is approved.
- In case it gets denied, select “Apply for Brand Approval”.
- To track the status of your approval request, select “Track your Approval” under the tab “My Listings”.
Number 3: Add product information
After selecting the category and brand of the product, you have to add the specifications and details of the product. By involving this process, the customer is able to make an informed decision whether he wants to purchase the product from you or another seller.

Image Source: flipkart.com
Thus, you have to ensure that you make your product unique, so that it sells. In order to do that, you have to add
- Product description: Let’s take the example of a grocery item like Peanut Butter. You could add details like cuisine, specialty, ingredients, weight, storage instructions, manufacturer etc.
- Images: Add various angled images of your product. Remember, visual images appeal more than text to the customers. It’s essential to add as many clear and visually appealing images as possible.
Flipkart has issued image guidelines for different categories of products.

Image Source: flipkart.com

Image Source: flipkart.com

Image Source: flipkart.com
- Additional Information: You can include information like customer review, bestsellers rank etc.
Now that you know how to compile the single list, let’s take a look at the step-by-step process involved in bulk listing.
Number 1: Log into the Seller Portal
- Using your username and password, sign into the Flipkart Seller Portal.
- Select the “Listings” tab on the main page.
- Navigate to My listings> Add New Listings> Add Bulk Listing.
Number 2: Select the category
You have to select the category under which you are going to sell your products.
- Click on “Select the category” tab.
- Choose the category and sub-category that you want to sell your products under.
- Select the “Download Template” option.
Number 3: Incorporate changes to the template
Once you have downloaded the template, it’s time to make changes to it.
- Open the Excel template. The Summary Sheet, which is the first sheet, elaborates on the working of the template, according to the category you selected.
- Go to the “Index” sheet and select the sub-category of your choosing. Let’s take the example of the category of footwear. You can select the sub-category “Women’s Shoes” and so forth. It will take you to the relevant Excel sheet in the template.
- Start updating the information, from column G. Enter the SKU ID, brand, style code and size based on admissible values.
- By using data from the Index sheet for a particular column, the template provides a link to you. You have to copy and paste this data by clicking on the link in order to avoid making changes later on.
- You have to compulsorily give details for the column heads that are coloured blue. Those highlighted in green are optional but it is always beneficial to provide this information to the buyers.
Number 4: Addition of image URLs to the template
- Navigate back to “Add New Listings”, select “Add Bulk Listing” and choose the “Image Uploader” option. Select the category and sub-category for your product.
- Put in the SKU ID of the product. Navigate to “Choose File” and select the file from the folder in your computer.
- After doing that, select “Upload Image”. A URL will be displayed on the screen. Copy the URL.
- Paste the URL in the corresponding column in the template:
- Main Image URL.
- Other Image URL 1.
- Other Image URL 2.
Number 5: Submit your catalog for Quality Check
- After clicking on “Add Bulk Listing”, choose the “Upload Catalog” option.
- Choose the correct template file and upload it.
- Finally, select the “Send To QC” button. Your catalog will be sent for the same.
- You can easily check the status of QC. Once you have uploaded the bulk listings file, click “View” and navigate to “History” to check the status of the uploaded file. The request ID will be available on the left side of the screen.
- Additionally, you can use this ID to contact seller support if you face any listing related issue.
- Under this tab, you will see the main feed request ID. Expand it to view the subfeed request ID. It will display the status of your quality check.
Here you go!
Creating a list on Flipkart is easy. The trick is to make an efficient one so that your customers cannot resist buying your products from the get-go. There are various benefits of doing so. You gain your customer’s confidence in you, and your products. By providing a detailed description of your products, your customers will deem you to be a trustworthy seller. This will have a positive impact on your products’ sales scale and will lessen the ratio of product returns.
Well, this is how simple it is to list your products on Flipkart. If you want to create a sales wave in the e-commerce industry, this is where you have to start.
If you are having difficulties in understanding the technical know-how, our digital marketing experts are here to help you. Contact us now.


