vividreal | June 2, 2020
The Complete Guide to Using Google Search Console
An error appears on your screen. Your website is facing issues. It would have been amazing to have a software which would automatically update you regarding the site’s performance in search results, any website issues and security problems if any. Your search stops right here.
Google Search Console.
No, it’s not a gaming console. That’s your fairy Godmother in disguise. You can efficiently monitor and manage your website using Google Search Console. It’s an extensive tool launched by Google to provide useful statistics of your site’s performance, the SEO’s improvement, CTR tracking, apart from many other elements.
But if you are a newbie to the game, you need to know how to effectively use the Console. Otherwise, it would not serve justice to your website’s performance and improvement.
And hey, if you require professional assistance on all of this, Our team of Digital Marketing experts will help you out. Check out our services.
So, how do you go about using it?
An all-important reminder. It does not work without a Google Account. So, if you do not have one, create it and sign in to it. These are the steps you have to follow to set up Google Search Console.
Step 1: Add a property
You have to integrate a “property” i.e. an element which Google can track and manage. In your case, it will be your website. In order to do that, click on the tab labelled “Add a property”.
Select the type of property, type in your website’s URL and add it.

Image source: wordstream.com
That’s about it for the first step. Easy, right?
Step 2: Site verification
Verification of your site has to be completed before you can move forward. Google provides many options, but it recommends HTML file upload. The other options, apart from HTML, for GSC verification are:
- You can add an HTML tag to your site’s home page.
- You can sign in to your domain name provider.
- You can verify your site with Google Analytics or Google Tag Manager account.
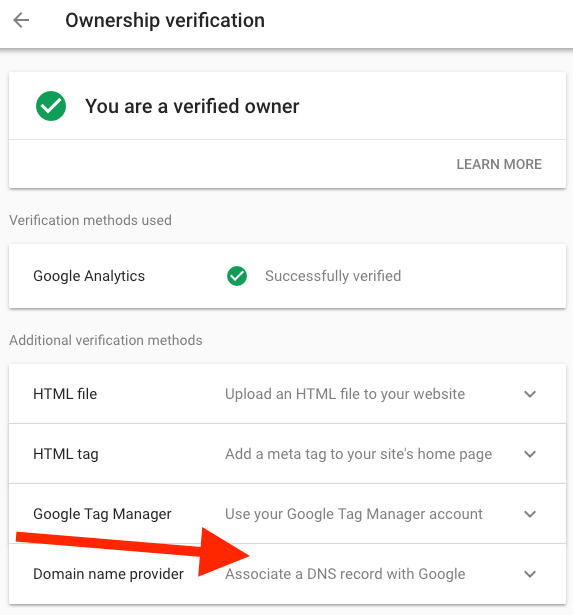 Image source: searchengineland.com
If you select the HTML file upload option, you have to
- First, download the HTML verification file.
- Second, upload the file to your host provider.
- Third, confirm the successful upload by visiting the host provider’s link.
- Fourth, click “verify below”.
It’s important to keep in mind that you will require a separate GSC property for every version of your site. In order to receive the maximum amount of data, add all of them. This includes the HTTPS, HTTP, WWW versions, amongst others.
Step 3: Link your Google Search Console to Google Analytics
After the verification of your website, link your GSC to Google Analytics. This will connect the two accounts, enabling the transfer of data and its consequent analysis. To link the two accounts,
- Sign in to the same Google Account.
- Go to Google Analytics.
- Navigate to the “Admin” interface and click on “Property Settings”.
- Scroll down and click the tab “Adjust Search Console”.
- Add the website’s link by clicking on the “Add” tab.
- Click on the “Save” button.
Go back to the Search Console Settings and hit the refresh button. If it’s a success, you will see your site listed when you click the “Enabled views” dropdown box.
You are good to go.
Step 4: Add a sitemap to your Search Console
By using Google Console, you ensure that your website is efficiently scanned, significant pages indexed and the data evaluated.
By adding a sitemap in a format supported by Google, you can make this happen. Using an XML sitemap by taking the aid of an online tool like XML-Sitemaps.com is highly recommended.
To add a sitemap to Search Console, copy the needed URL and go back to the Search Console account. Navigate your way through to reach Crawl>Sitemaps>Add/Test Sitemap button. Now, paste the URL in the space provided and refresh the page to see your sitemap data.

Image source: shoutmeloud.com
A sitemap improves your site’s crawlability by making it easier for the Google bots to scan your pages and report any element changes, errors, additions etc. Also, sitemaps use rich media content so that Google can easily format and display your website in search results.
Step 5: Add your site URLs to Google
It’s a given that you have to register your site with Google in order to utilize the perks of Google Search Console. Additionally, you can submit a URL in Google by using the option of “Fetch as Google”.
Under the menu of “Crawl” on the Console panel, select the “Fetch as Google” option. Click on the “Fetch” button. Once it shows “complete” on the panel, click on the “Submit to Index” button.
A report stating that the URL and linked pages have been submitted to Google’s index will appear on your screen.
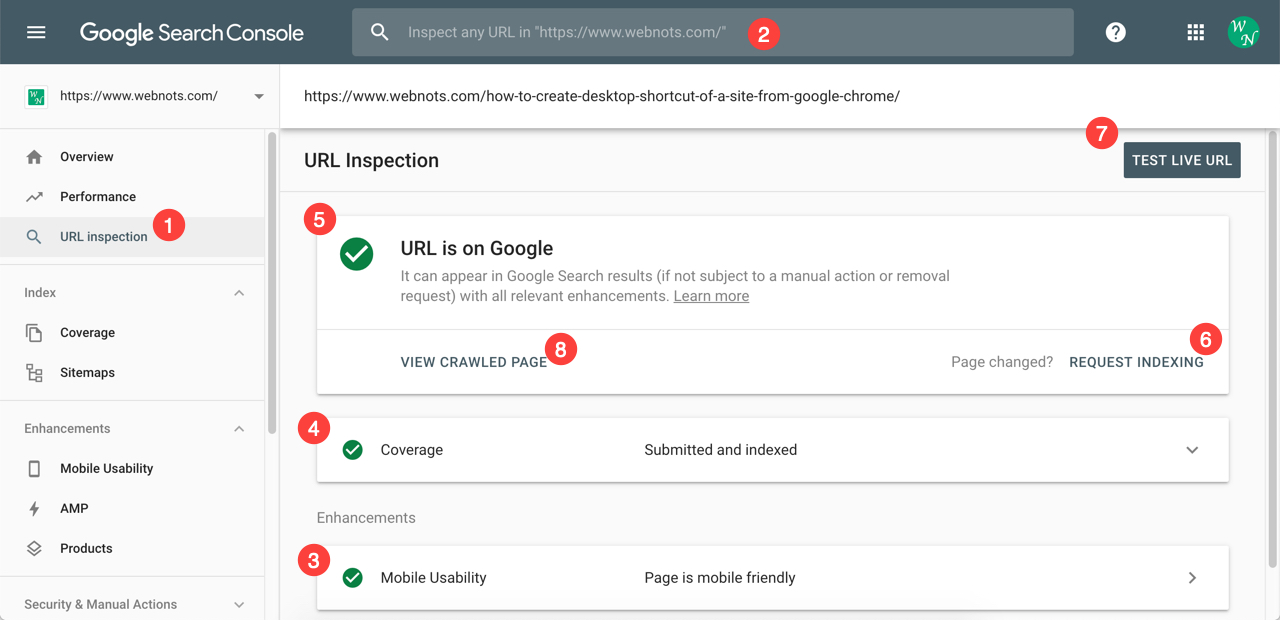
Image source: webnots.com
How do you utilize the perks of Google Search Console?
Once you have finished setting up your Search Console, it’s time to understand how you can put it to best use to improve different elements of your website and increase its value in search results.
Let’s take a look at the filters one by one.
-
Search
Web, image and video are the three search types. You can select any one of the filters depending on the source you receive your maximum traffic from. You can also compare two different types of traffic by clicking the “Compare” tab and selecting the two categories you want a comparison of.

Image source: botify.com
-
Date Range
The Search Console provides you with 16 months of information and data. You can select from a vast range of pre-set time periods or customize your own time period. Select either and click on “Apply”. Just like the Search type, you can compare two date ranges using the “Compare” tab.
-
Additional elements
By clicking on the “New” tab, you can add up to five different filters, namely
- Country
- Page
- Query
- Device
- Search Appearance

Image source: searchenginewatch.com
Trying different combinations of filters so that you can gain the maximum output from the searches.
Parts of Google Search Console
-
Search Appearance:
It helps you to visualize your site’s appearance in the search results. Rich and relevant snippets, various frameworks such as Accelerated Mobile Pages and HTML corrections can aid in making your website look unique in search results. Its constituents are:
- Structured Data: It is in the form of rich snippets and marks your content to pop up on search results by better indexing.
- Rich Cards: Although they are similar to Structured Data in functioning, they are visually more enticing. This can aid in increasing traffic to your website and help in conversions. Google provides you with a tool to test live data.
- Data Highlighter: It acts as a brilliant substitute for Structured Data as you do not require a developer to write code snippets in your HTML coding.
- HTML Improvements: It reports any problems, such as duplicate meta descriptions, missing title tags, found by the Search bots whilst indexing your site.
- Sitelinks: By adding relevant content on your website, Google will add sitelinks below your URL and once it receives admirable traffic, Google will automatically display your categories as sitelinks.
- Accelerated Mobile Pages (AMP): This allows developers to build fast-loading HTML and JS pages. The aim is to make web pages adapt quickly on the mobile interface.
-
Search Traffic:
This section consists of
- Search Analytics Report: It displays your site’s total CTR, total Impressions, total Clicks and Position using different filters and comparative analysis.
- Links to your Site: It reports the sites that link to your URLs and the keywords used by most of the backlinks. You can increase the number of backlinks by increasing engagement on sites that link to you.
- Internal Links: It displays the number of internal links pointing to a page on your website. Use these to direct the links to content-filled pages on your website, rather than the “About” page.
- Manual Actions: It provides information on any Google penalties given to your site. After fixing the error, make sure you file a review request to bring your site ranking back in the SERPs.
- International Targeting: It is only applicable if your website caters to a public domain outside your main geographical location.
- Mobile Usability: It displays the problems and issues which act as a hindrance to delivering a positive web experience on the mobile interface. To increase your traffic, you need to optimize your site well for mobile use.
-
Google Index:
This part describes the functioning of Google to crawl and index your website. Its sub-parts are:
- Index Status: It states the URLs which Google has indexed, blocked indexes and any removed URLs.
- Content Keywords: It gives a report on the keywords mentioned in your content and their relevance in the search results. You can optimize your content by well-ranking keywords in the title, headers, alt tags, page SEO etc.
- Blocked Resources: It gives information of where your blocked resources such as CSS, JQuery, image files are hosted. This acts as an obstacle to Google’s effective indexing of your pages and hampers your search engine rankings.
- Remove URLs: It tells Google about the URLs which contain sensitive data and thus, prevents it from indexing those URLs. Also, you can remove URLs which do not add any value to your website.
-
Crawl:
This part gives a report on Google bot’s website crawl rate, reported errors, sitemap, URL parameters etc.
- Crawl Errors: It shows server errors, soft 404 errors, URLs redirecting users to irrelevant pages, the last date Google bot crawled your website.
- Crawl Stats: It gives the daily report of the bot’s activities on your website. It also shows the “heavy and light” dimensions of your pages.
- Fetch as Google: It allows you to test the process which Google undertakes to fetch your URL and renders it. Google can show statuses such as complete, partial, redirected, not found, not authorized etc. In this case, fix the issue and resubmit the pages for indexation.
- Robots.txt Tester: It directs the search engines towards the pages they should “crawl” and informs about those which they are barred from doing. Additionally, it allows you to test pages for any blocking.
- Sitemaps: It helps various search engines to efficiently crawl and index your website’s URLs, by auto-tuning your sitemaps.xml file.
- URL Parameters: This section should be handled by your developer if you do not know the essentials of coding. This particular part allows you to impart specifications to Google on how to handle your URLs.
-
Security Issues:
If your website has been hacked or vulnerable to the same, flagged for phishing or prone to any online malfunctioning, this section informs you about it immediately and keeps you updated regarding the status.
-
Other Resources:
It is a vast collection of Google’s tools and testers which aid in better functioning of your website. A few of them are:
- Structured Data Markup Helper
- Email Markup Tester
- Google My Business
- PageSpeed Insights
What is the Search Console used for?
Here are a few all-essential functions of Google Search Console.
(a) To identify and evaluate your maximum-traffic pages
You can witness the progress in the above by clicking on Performance>Page>change the date range to “last 12 months” (you can adjust it)>select “total clicks”.
This will display the graph showcasing the number of clicks on your website’s link in the search results.
(b) Calculate the average CTR
To calculate the average CTR, navigate to the “Performance” tab, choose the “date” and adjust the time period. Simultaneously, analyze two date ranges by using the “Comparison” filter. Your site’s average CTR will be displayed on the screen.
Similarly, you can see the statistics of “Total Impressions” and “Average Position”.
(c) Keep monitoring your CTR and impressions
It’s crucial to keep an eye on your CTR. If your impressions have seen a rise but your CTR has dropped. It means that you are only ranking for keywords. And if your CTR has increased but impressions have dropped, you have lost out on keywords.
Thus,creating relevant content and consistent optimization of your pages will aid in the increase of both CTR as well as impressions.
(d) To identify your highest and lowest ranking pages
To identify the above, navigate to the “Performance” tab, choose the “Page” option, change the date range to “Last 28 days” as you will get a concise report, select “Average Position”, and navigate to the small upward arrow to sort from smallest to highest .
Repeat the same procedure up to selecting “Average Position”. Then, select the downward arrow to sort from highest to lowest.
This will display the highest-ranking pages and lowest-ranking pages on your website, respectively. Additionally, it will also provide the average position.
You have to keep in mind that the success of your website does not solely depend on one high-ranking page or one low-ranking one. If your site is efficiently optimized and kept updated, you will see a consistent improvement in its performance and results.

Image source: kinsta.com
(e) To compare your site’s performance on various interfaces
In order to analyze the performance, select the “Devices” option under the “Performance” section. Select the options “Total Clicks”, “Total Impressions”, “Average CTR” and “Average positions.
This will display your website’s performance across different interfaces.
Conclusion
If you are looking to reap the maximum benefits out of your website, utilizing Google Search Console is the best option to move forward with. It helps you to keep your website updated, troubleshoot errors and maximize the optimization of your website.
To increase your website’s visibility in search results, traffic and site ranking, the Search Console is your go-to tool. So, here you go. By following this guide, you will be able to efficiently use Google Search Console.
Have a go at it!
If doing all these sounds complicated, you can reach out to us. Feel free to connect with our team of Digital Marketing experts for any professional assistance.


